
Before heading out to the Denver airport on the way back home last weekend, my girls couldn’t help but take advantage of a big leaf pile.

Yeah Fall!

Get Ready

Set

Go!


yipee!

getting leaves picked out of hair
 Email this to a Friend
Before heading out to the Denver airport on the way back home last weekend, my girls couldn’t help but take advantage of a big leaf pile.
Yeah Fall!
Get Ready
Set
Go!
yipee!
getting leaves picked out of hair
Email this to a Friend
What’s nice about my Thanksgiving cranberry punch recipe is that it can be made well in advance and stored for Thanksgiving Day as part of my Toni’s 12 Days of Thanksgiving.

Ingredients

Instructions

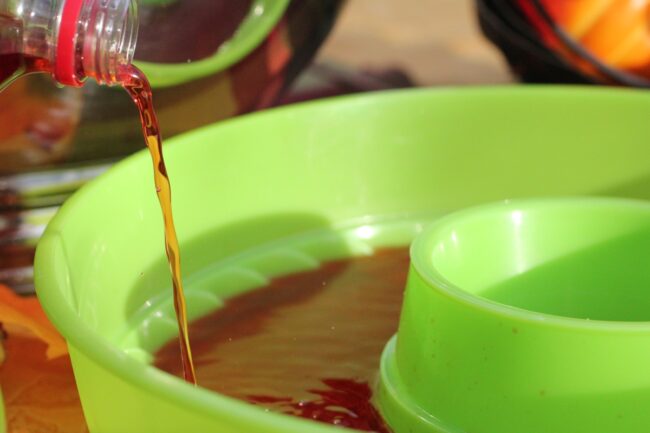
You will want to make and freeze your Cranberry Ice Ring for your Sparkling-Spiced Cranberry Punch ahead of time and today is the perfect day to do it.
To make the ring, I use a plastic chip-and-dip server because it has the hole in the middle, like a bundt-cake pan.
Ingredients
Instructions
You must have a punch bowl large enough to fit the ice ring in. Here is a great suggestion at a great price:

Anchor Hocking Presence 18-Piece Punch Bowl Set with Ladle $35.74 (regular price $44.99)
For more Thanksgiving Holiday inspiration, visit Toni’s 12 Days of Thanksgiving:

Toni’s 12 Days of Thanksgiving

Sparkling-Spiced Cranberry Punch with Cranberry Ice Ring
Email this to a Friend
Thank you Dayle Cedars at ABC’s Denver 7 for a fun discussion about planning the perfect Thanksgiving dinner.
Email this to a Friend
It’s been exactly a year since I began doing my own food photography. So one year and one thousand food photos later I’ve discovered- through trial and error… and error- what works for me.
I’ll start first by saying that before November 2010 I was never interested in photography- neither as a hobby or professionally. To be honest I never really gave it much thought. I just grabbed my “point and shoot” and let it do all the work for me.
Now I’ve discovered that photography really is an art form. And what I mean by this is that you really can see an individuals intimate style and inspiration through their photographs. Now, I understand that many of you may be thinking “well, of course you can”. However, I didn’t discover this until only recently. I always only thought of photography from a technical aspect.
I may not be able to speak too much about aperture, shutter speed or which mm lens to use for which photo, but I can tell you what has worked for me, especially when it comes to food preparation. So here are my tips to creating The Perfect Food Photo:
Lighting is obviously crucial for any photograph, but has the most impact on food’s taste appeal. I’ve invested in a professional light box and umbrella photography lighting, and nothing- I mean nothing- compares to that diffused natural lighting you get at dusk and dawn.
Direct sunlight is too harsh and causes reflections on cookware and utensils, but that soft natural indirect light brings out all the taste appeal in your food photo. Here is an example of dish I photographed in a professional light box and underneath that is a photo using natural indirect sunlight.

photo taken in a professional light box

photo taken with natural indirect sunlight

photo taken in direct sunlight
On days that I’m cooking and photographing I end up running around during that special hour at dusk to get all of my shots. After a while you find certain areas that seem to get that perfect light, like the spot near my kitchen window that I know at exactly 6:23 is going to bring the most amazing lighting for my food, or the table outside in my meditation garden that at 6:43 will be even better.
And it’s truly amazing how trained your eye becomes after awhile and you can’t help but notice how certain lighting that makes even the most mundane thing look like a work of art to you. One day I was cracking eggs to make a breakfast frittata and I couldn’t help but notice how beautiful they looked in the early morning light. I officially became one of those people who has to stop what I’m doing to take a photograph (which can get frustrating at times for my family- “ooh, don’t eat that waffle yet, I want to photograph it first!”), but they’re used to it.

Cloudy days are a gift for me living here in the desert. Whenever I hear a forecast of “mostly cloudy” I head off to the market to prepare for a day of cooking a photographing. No more running around to get my shot in before the sun sets; cloudy days give me an entire day of beautiful diffused sunlight.
Composition is really a matter of personal style. Tight up-close shots require very little composition- maybe just a napkin or utensil if that. While shots that have a lot of composition are typically time consuming and a lot of work. But again, it’s really a matter of the style of photo you’re looking for.

a lot of composition went into this shot

no composition- just me and the food
In the beginning I thought I needed a lot of composition and spent too much money of props. Now it’s really dependent on the style of photo I’m going for. Look at the difference between the next two photos; does the one that shows all the adorable tableware have more or less “taste appeal” than the up-close shot?

more of the composition is included in this photo

tighter shots may have more taste appeal
Food, especially vegetables, that are slightly undercooked will photograph far better that something that is fully or overcooked. Here is an example of a photo from my where the taste appeal of the slightly undercooked version came out far better than if it were fully cooked.

If food, especially bread or meat, is looking a little dull and needs a “pick me up”, simply give it a quick misting of oil. This is a tricky secret I learned early on. If you have a “Misto” (olive oil sprayer), keep it nearby.
The camera that I use and love… and have nothing to compare it too is the Canon Rebel T2i that was chosen for me because of its video capabilities as well.
I did invest in a macro lens which was an awesome decision for food photography.

Canon macro lens 50mm or 60mm

Learning how to use and adjust your aperture is probably the first thing you want to learn before worrying about ISO or anything else. Being able to focus on your subject and control your viewers eye can be done through aperture.
Look at where the viewers eye is being controlled in the next two photos:

controlling viewers eye to salad

controlling viewers eye to Rigatoni using aperture
I shoot on the manual setting only, and only because this is what has worked best for me so far. I am still an amateur when it comes to most of the technical capabilities of my camera.
Everyone has their own style… including you. Find it and trust it.

Before I let you go I have to share one more shot that is a perfect example of artificial versus natural lighting.

artificial light

natural diffused sunlight
I would love for you to share your food photography with us on Facebookand join us tonight on twitter for more sharing of #mealplanning ideas!
5 winners will receive a YEAR LONG subscription to Weekly Meal Plan System from The Organized Cook™. RSVP below to win!
Email this to a Friend
Family meals are important. Iʼll show you easy ways to spend less time and money at the grocery store, less time in the kitchen and more time with your family.
![]()
![]()
![]()
![]()


Three months of our most popular menus from The Organized Cook™ Weekly Meal Plan System including grocery shopping lists, cooking instructions and lots of time and money saving tips in one book that's easy to fit in your purse.
Start saving now! Save time and money at the grocery store and in the kitchen. Order Now.


